How to include in the "Vord" line and why it is needed
In this article, we'll show you how to include"Vord" line. Let us examine two of the most well-known methods. In addition, we will tell you how to do this in different versions of the program. Also, do not forget to mention why the ruler is needed and what you can do with it. If you use the program "Vord" for professional purposes or are just going to master it, this article is just for you.
We include the ruler in the 2003 WORD
In the "Vord" line include differently, independing on the version of the program. Now we will consider the most famous and still popular - the 2003 version. Many have become so used to it that they still do not want to switch from it to a later version. And someone uses it because the computer's power does not allow you to install a newer one. But anyway, the tool, about the use of which will be discussed in this article, is present in this version. So, how to include the ruler in the "Word"?

It is quite easy to do this. You just need to click on "View" from the top of the toolbar. A context menu will open, in which you will need to tick off the "Ruler". After you do this, you will add one more element of the interface - a ruler.
We include the ruler in the latest versions of the "Word"
On later versions of the program in the "Word" lineup can be almost the same, but there are some differences.
First you need to go to the tab"View". Only here the context menu does not open, just the program's ribbon will change. In this tape, find the area that is called "Show." In it there are three fields for a tick, you need to put it where it says "Ruler".
The second way to include a ruler
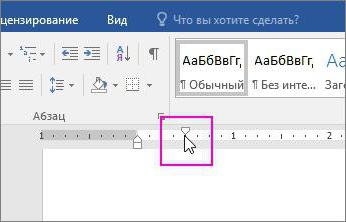
So, we have already figured out how in the program"Vord" include a ruler. But, of course, this is not the only way. Moreover, it is quite expensive in time, which can not be said about the one that will be given now. However, it is worth noting that it can not be used in all versions of the program. For example, in "Vorda" 2007 it can be applied, but in the new version of 2016 - no.
The essence is simple: you need to click the corresponding icon, which is located above the page scroll slider vertically. The icon itself and its exact location can be seen in the picture.

Clicking it, you turn on the ruler.
What a ruler can do
Of course, the article would not reveal the topic ifIt was not told about the functions of the ruler itself. After all, it's silly to add to the program a tool that only measures the page size vertically and horizontally. Now we will analyze in great detail all the features of the line and its application.
Indent
In the "Vord" the ruler can be applied in different ways. You can use it to measure a page, but this is not necessary, because the standards are always the same. Now we will analyze two main applications of the ruler, and start with indentation.
In order to indent or paragraph, or, asit is also called a "red line", you need to use the slider on the ruler. This slider is on the left side of the horizontal ruler. It is located at the very top.
To make a paragraph, you just need to pull this slider to the right side. Note, if you want to indent all paragraphs of the text, you must first select it.
Make a ledge
The second function of the ruler is the projection. It shifts all lines of the paragraph except the first. To do this, you need to use the slider, which is located in the middle.
The essence is the same as with indentation. You must first select the text that you want to convert, and then change the location of the slider.
As for the other sliders,just. The bottom one serves to fix the distance between the middle and upper sliders, move them to the left or to the right. And the slider on the right is necessary to change the size of the text lines themselves. But it is best to change their position on their own to find out everything in practice.
</ p>