As in the "Word" make the background of the page and the background behind the text
Every user would like his work somehowselect that it does not resemble any other. Fortunately, the word processor "Word" provides a bunch of options and special tools for this. In this article, one of these tools will be analyzed. We'll talk about how to make a background in "Vord". All possible ways will be analyzed, starting with how to make the background of the entire page, and ending with how to change the background behind the text. But first things first.

Change the color of the page
First of all, we'll figure out how to make the page background in Word, using standard templates of the program for this purpose.
The first thing, of course, is to findThe corresponding tool on the top panel. Immediately it is necessary to say that we will use the program of 2016, therefore, with previous versions there may be discrepancies. But in the text everything will be explained for them, so that questions should not arise.
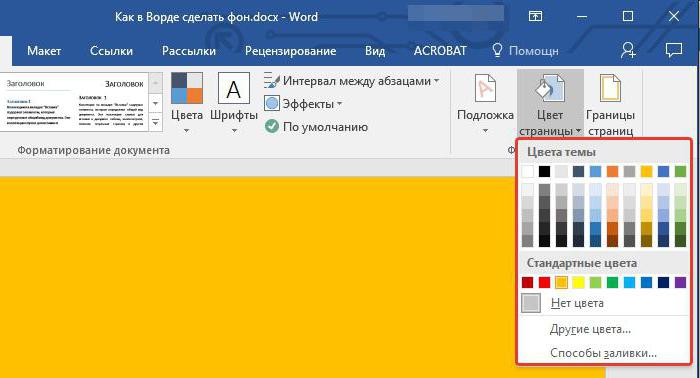
We need the "Color Page" tool, whichis located in the "Design" tab. If you are using an older version (before Word 2010), then this tab will be called "Page Layout", in Word 2003 you will need to use the tools that are in the "Format" tab. So, now on the toolbar you need to find and click the "Page Color" button.

The result is a drop-down menu in which youcan choose the background you like. By the way, if no color suits you, you can use a larger color spectrum. To do this, click on the "Other Colors" button.
This was the first way, as in the "Word" make a background. But as you can see, it only allows you to change the color of the page, without introducing any significant changes. Now let's talk about how you can even more embellish the document.
Make the page background using standard tools
If a simple fill of the sheet does not suit you, and you want something else, now it will be told how to make the background more sophisticated in the "Word".
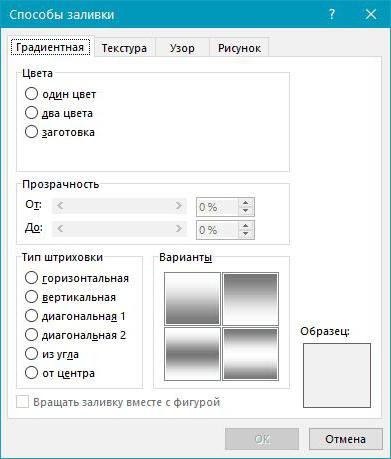
For this, being on the same tab and clicking onbutton "Page Color", in the menu, select "Fill Methods". Before you open a window in which you will need to determine the tool used. There are four tabs: "Gradient", "Texture", "Pattern" and "Drawing". The fourth one will not be considered.

Gradient filling speaks for itself. In this tab, you will need to select one or two colors for the fill and specify their hatch type. If desired, you can use the workpiece.
The texture overlay, in the corresponding tab,implies that you select one of the submitted samples. You can impose a wood texture or use crumpled paper - anything you want.
In the "Pattern" tab you have to choose one of the suggested patterns - everything is simple.
In general, it will be more reasonable if you yourselfLearn about each tab and select something for yourself. As a result, you only need to click the "OK" button for the changes to take effect. And do not forget that you can always change your choice.
Making our own page background
Now go to the "Drawing" tab. Now we'll figure out how to make a background in "Vord", using your own picture for this.
This is done quite simply, in the same window"Fill methods", in the "Drawing" tab, click on the button with the same name to open the window. Select "From file". In the explorer that appears, you must pave the way to the desired drawing and click the "Insert" button.
After that you can set several parameters, then click "OK".
Make the background behind the text
Finally consider how in the "Word" to make the background behind the text.
This procedure is painfully simple. Initially, you will need to select that part of the text whose background you want to change. After that, in the "Home" tab, click on the "Text highlighting color" button. The exact location of the button you can see in the picture below.

In the drop-down menu you will need to select the color to taste and click on it LMB. As a result, the background behind the text will be painted in the color you have chosen.
</ p>


